DESIGN DECISION
Two independent visual loops
The red target and green tracker are physically independent. The tracker observes through its camera and adjusts from image error, satisfying the no-communication rule.
OpenMVMicroPythonPIDStepper Motor
Based on the OpenMV development board, wrote target tracking and dual motor control programs. Designed and tuned the PID control algorithm to achieve precise tracking and stable reset of the laser pointer to the target. Implemented instant reset, tape tracking, and tracking of another laser point according to the competition requirements, winning the first prize in Fujian Province with a perfect score.
VISION PID CONTROL
OpenMV detects the screen and target spot; PID continuously corrects two stepper motors from the 2D error.
DESIGN DECISION
The red target and green tracker are physically independent. The tracker observes through its camera and adjusts from image error, satisfying the no-communication rule.
CAPABILITIES
The 2023 University Student Electronic Design Competition is a national competition, starting with provincial selection, and outstanding participants can be recommended to participate in the national competition.
The competition requires the development of an electronic system according to the announced topic within 5 days and demonstration of its functionality.
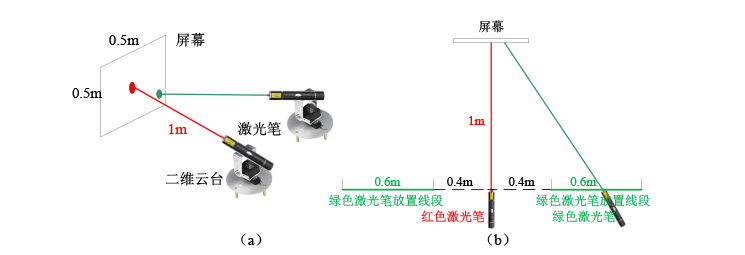
Design and create a moving target control and automatic tracking system. The system includes a red spot position control system simulating target movement and a green spot position control system indicating automatic tracking. The system structure diagram and placement position are shown in Figure 1(a). Two laser pointers are fixed on their respective independent two-dimensional motorized platforms.

The red laser pointer emits a spot used to simulate the moving target, which falls on a white screen 1m in front, with a spot diameter ≤1cm. The red spot position control system controls the spot to move anywhere within the screen range.
The green laser pointer emits a spot controlled by the green spot position system to automatically track the red spot on the screen, indicating the automatic tracking effect of the target, with a spot diameter ≤1cm. The placement line of the green laser pointer is shown in Figure 1(b), which is parallel to the screen and located on both sides of the red laser pointer, at a distance greater than 0.4m and less than 1m from the red laser pointer. The green laser pointer can be placed anywhere on the two placement lines.
The screen is white, with an effective area greater than 0.6x0.6 square meters. A square with a side length of 0.5m is drawn at the center of the screen with a pencil to mark the edges of the screen; the center of the drawn square is the origin, and the origin position is marked with a pencil, with a pencil mark width ≤1mm.
Set up a moving target position reset function. When this function is executed, the red spot can return to the origin from any position on the screen. The distance between the spot center and the origin error ≤2cm.
Start the moving target control system. The red spot can move clockwise around the edges of the screen within 30 seconds, with the distance between the spot center and the edge line ≤2cm during movement.
Use black electrical tape about 1.8cm wide to stick a rectangle along the four sides of an A4 paper, forming an A4 target paper. Stick this A4 target paper at a self-determined position on the screen. Start the moving target control system, and the red spot can move clockwise along the tape within 30 seconds. Overtime will result in no score, and if the spot completely leaves the tape once, 2 points will be deducted; if it continuously leaves the tape for more than 5cm, it will be scored 0.
Stick the above A4 target paper on the screen at any rotation angle and position. Start the moving target control system, with the same requirements as (3).
Moving target position reset, one-key start of the automatic tracking system, controlling the green spot to track the red spot within 2 seconds, and issuing continuous audio-visual prompts upon successful tracking. At this time, the distance between the centers of the two spots should be ≤3cm.
The moving target repeats the actions of basic requirements (3)~(4). The green laser pointer emission end can be placed at any position on its placement line, and both the moving target and automatic tracking systems are started simultaneously. The green spot can automatically track the red spot. After starting the system for 2 seconds, tracking should be successful, and continuous audio-visual prompts should be issued. Thereafter, if the distance between the two spot centers exceeds 3cm during tracking, it is defined as tracking failure, and 2 points will be deducted once. If tracking fails continuously for more than 3 seconds, it will be scored 0. Both the moving target control system and the automatic tracking system need to set a pause button. When the pause buttons are pressed simultaneously, the red and green spots should stop immediately to measure the distance between the two spot centers.
Others.
The red and green spot position control systems must be independent of each other, with no communication between them; the spot diameter is less than 1cm; there are no electronic components on the screen; the control system cannot use a desktop computer or laptop. Non-compliance will not be tested.
If basic requirements (3) and (4) are not scored, the optional part (2) will not be tested.
Our approach is to use two stepper motors to control the horizontal and vertical rotation of the laser pointers, adjusting the motor rotation angles to control the position of the emitted laser spots.

By creating a button panel for input control signals, including start, reset, and pause function buttons.

The device uses the OpenMV integrated with visual algorithms as the control core.
To achieve the target tracking function, we use the OpenMV camera to capture the position of the red spot on the screen and calculate the coordinates of the spot through image processing algorithms, thereby adjusting the position of the green laser pointer to achieve tracking.
OpenMV development is based on the MicroPython. We wrote two separate programs, which run on the red spot control system and the green spot tracking system, respectively.
# Pseudocode for Red Spot Control System
# get the position of the shape
def get_our_rect_final_pro(a, b, c, d):

    corner = [a, b, c, d]

    img.draw_circle(a[0], a[1], 5, color = (0, 255, 255),   thickness = 2, fill = False)
    img.draw_circle(b[0], b[1], 5, color = (255, 0, 255),   thickness = 2, fill = False)
    img.draw_circle(c[0], c[1], 5, color = (0, 0, 0),       thickness = 2, fill = False)
    img.draw_circle(d[0], d[1], 5, color = (255, 255, 255), thickness = 2, fill = False)

    heighest_y = min(a[1], b[1], c[1], d[1])

    ... # There is more code here